Proven Photo Retouching Tips for Fashion Magazine Designs
Many photographers want to enter fashion photography segment. They desire to perfect the art of high end photo retouching to become famous and popular. If you are one in the same league, you need to learn how to retouch photos in studio like professionals.
This post would discuss proven fashion magazine photo editing tips which would help you showcase fashion images with ease. You would require Adobe Photoshop or Lightroom for this purpose.
a) Cropping the Image
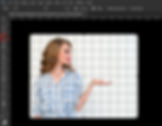
Crop Tool is one of the fundamental tools for editing photos in Photoshop. The most desirable elements of the image can be enhanced with this and unwanted elements can be removed. While retouching, you have to eliminate unneeded parts from the image’s backdrop. Never cut off the limbs of the models at the joint. The subject should not be placed at the center of the image. While doing face retouching in Photoshop, some free space should be left. Portrait images should be cropped at the eye level.
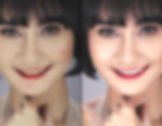
b) Natural Retouching of Skin
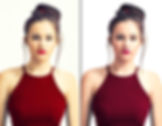
Challenge is involved in giving natural feel to the skin but it is possible to do. You have to achieve the correct sharpness level. If the level becomes too high, the skin of the model would become very clear. This would make even minor details of the skin noticeable to the viewer. As an accomplished fashion magazine photographer, you have to go for high end smoothing of skin so that it appears awesome in high resolution.
You can spend long hours on Photoshop to perfect the art of high end retouching. Clone and Healing tools can be applied for getting the desired outcomes. Amateurs often seek the easy path which involves wiping out the texture present. This results in bright skin sheen which is unrealistic. It does not matter where you start. What matters is that image retouching should be started with complete body and then you must proceed to natural skin retouching.
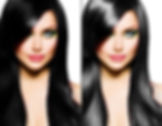
c) Adjusting Skin Tone
Just by looking at the retouched photo, discerning viewers can identify whether a novice or professional has edited the photo. The skin tone would provide the clue. An image properly retouched in Photoshop would feature attractive selection of colors including shades of yellow, brown and pink.
d) Using Frequency Separation Method
For retouching images in Photoshop, frequency separation technique is amazing. The tool can address the colors separately from the details on various layers. These are known as frequency as well as low frequency. Photos can be retouched by you without affecting the colors and shadows. These would be enhanced on a different level. The focus should be on making skin tone natural.
e) Using High End Actions in Photoshop
You can retouch photos conveniently and quickly in Photoshop with the help of high end retouching actions. The perfect portrait can be achieved in few clicks. Portraiture can be edited and enhanced really swiftly in Photoshop with these actions. Color can be corrected, skin can be edited, eye color can be changed, teeth can be whitened etc.
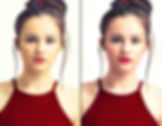
f) Improving Colors
After capturing the photos, you need to correct the colors. You have to learn the technique of managing the proper color grading. For this, a number of parameters have to be set right by investing quality time. Prominent parameters include highlight, hue, noise, curve, saturation, contrast, shadows, exposure and white balance.
Before starting with color correction, you need to calibrate the monitor. You can benefit from the Lightroom Basic Panel. Color grading should be done in attentive manner. You must refrain from overdoing the same in the haste to accomplish a natural looking picture. The highlights should be intensified for enhancing the contrast present. All photos should be made in similar colors to the maximum extent possible. Different effects such as pastel, B&W, film, matte, vintage etc. should be used.
Most photographers are not interested in retouching the images on their own on Photoshop. The prefer to take professional support. If you are a beginner and is working hard to carve a niche for yourself in the competitive landscape, you should pose trust on image improvement companies like WBS. It is better to outsource the job to someone who is an expert in this rather than send poor quality images to the magazine publisher. Apart from color correction, other services can also be availed of. These include correcting deep color, removing stray hair, retouching skin, Dodge and Burn effect, reshaping of body, background change etc.
g) Noise Reduction
For producing top-notch photos for publication, a number of cutting-edge tricks are present in Photoshop. One such trick which is availed of by professional photographers related to reducing noise. Noise can show up in images due to poor lighting. For reducing the noise level, low ISO is helpful. You can apply the ‘Reduce Noise’ filter when applicable. For evaluating noise, you can try the RGB channels and can also use Surface Blur tool.
h) Whitening Teeth
A good smile on the face of model is a must for showstopper magazine publication. Glossy magazine pages essentially contain images of people with pearly white teeth. Natural teeth whitening is an important function supported by Lightroom and Photoshop. You can eliminate the yellow tint on the teeth and induce a natural smile on the face of the subject.
i) Enhancing Lips
The lips of the models attract the attention of onlookers and fashion lovers. Hence, it is important that the lips, normal or bee-stung, must appear seductive. Lip correction should be done even if the makeup of the model is brilliant. This is because the asymmetrical lines can ruin the portrait. For retouching the lips, you must create the first layer and smoothen the lips. You can apply a warm setting and then use the adjustment brush to make the lips appear smooth. A gentle feel should be given to the lips. You can achieve this by reducing contrast as well as clarity. During retouching of mouth, same brush should not be applied.
j) Changing Colors of Eyes

You would often come across instances wherein the color of the eyes of the model does not complement the overall image tone. For making the color appear natural, the color of the eyes should be changed. Enhancing the feel of the eyes of the model is much desired by professional photographers. As a photographer, you can master the trick on your own or can choose to outsource to a strategic partner like WBS.
For making eyes pop, you need to start Photoshop and go about creating a New Adjustment Layer. Next, select Exposure and fill the layer with a mask inversion. Now, concentrate on the iris and pupil of the eye. You need to use white and black colors to paint them respectively. In the regulation layer, navigate to ‘Luminosity’ in the blending mode. You have to increase the exposure for adding contrast to the iris. Eventually, working with Offset slider would help in changing the eyes’ color.
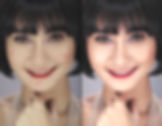
k) Adding Make-up in Digital Mode
For preparing for the photo session, models select the right ensemble and perform makeup. With time and due to adverse effect of lighting, professional makeup too can get spoil. If the makeup is not giving an attractive look the model, you need not be upset. In Adobe Photoshop, you can retouch the image of the model to impart digital makeup which would restore the glamorous quotient of the model.
For fixing the makeup and overall appearance of model’s face, you need to perform following actions in Photoshop. While sharpening the image, you need to use red channel more as skin texture is present in lowest amount in this. Iris can be boosted by selecting Radial Filter. Clone Stamp and Patch tool can be used for eliminating dark spots beneath the eyes. You can also smoothen the wrinkles with the help of Clone Stamp and Spot Healing Brush. The skin tone should be same for complete body and must be similar to color of face.
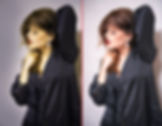
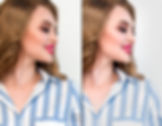
l) Adding Shine and Volume to Hair
You need to spend significant amount of time for adding volume and shine to hair as it is a challenging job. For this, you have the change the shape of hair, add extra hair and increase the volume. If the job is done meticulously without hurrying, the results would be outstanding.
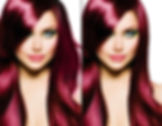
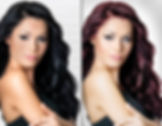
m) Changing the Color of Hair
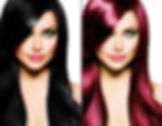
Hair color of the model has to be changed sometimes. If the hair is of fair color, you can change it to darker shade without any problem. However, if you have to render darker hair into fair color, the problem would show up. Even after spending long hours on the job, you may not end up getting the perfect result. If you are not attentive while changing the color of the hair, the hair may appear yellow in the image. You have to work hard for getting a realistic shade of hair color.
n) Eliminating Stray Hair
If the hair is in flyaway mode, it can be a cause of distraction for you as a photographer. While shooting outdoor, this problem is bound to show up. You can apply hair sprays on model or try other methods but the problem would persist. In Photoshop, you need to modify the selection edge to ‘soft’ or ‘sharp’ with the help of Contrast and Feathering sliders. Next, without overdoing, apply the ‘Healing Brush’. o) Using ‘Liquify Tool’ on Model’s Outfit
In Photoshop, you need to select the ‘Liquify Tool’. You can carry out different manipulations on model’s clothes such as push, pull, rotate, bloat, reflect etc. on complete outfit or part of it. If the bulges are incongruous, you need to apply retouching to those sections also to even out the same. Such bulges happen due to posing in wrong manner. Without overdoing, try to achieve naturalness in your image. p) Smoothening the Clothes
During shot taking, wrinkles and creases may be captured on the clothes of the model. Sometimes, dirty stains can also show up. You can eliminate the blemish, wrinkles and creases with the help of Frequency separation or Healing Brush Tool.
q) Eliminating Distractions
One of the important Photoshop tips is to delete objects that may be distracting the viewer and directing his/ her attention to something which is different from the subject of the image. During magazine designing, such photos can ruin the glamorous appeal of the models. Since the attention of the viewers would be diverted to trivial things, they won’t be able to comprehend the main message you are trying to convey. You must spend quality time for removing unwanted objects from the scene. Spot Healing brush can be used for eliminating unwanted objects of smaller size. Content Aware tool can be used for making quick changes. Content Aware Move or Fill can also prove useful. Entire array of odd elements can be deleted in Extend Mode. For returning to the earlier state, you can press Control + Z.
Conclusion
If you are planning to publish the photos in magazine or use for advertising, they have to be flawless. Photoshop offers cutting-edge tools to enhance the appeal of the images. If you are not willing to devote long hours to retouch the images, you can outsource the activity to professional photo retouching services like WBS.


